Learn how to craft custom effects racks in Ableton Live to take your sound design to the next level.
Ableton Live 11 has an exceptional selection of stock plug-ins that work incredibly well for sound designers. What makes this DAW stand above and beyond is the ability to customize your own effects racks. This extends your sound designing abilities by combining multiple effects and streamlining them into an easy-to-use workflow.
When I started out with Ableton, I never fully appreciated the stock effects. I would constantly look for third-party plug-ins but began to get stumped because most plug-ins were too expensive. I knew about Audio Effects Racks but never really understood how to build my own. Once I did, this changed the way I approach sound design.
What is an Audio Effects Rack?
Let’s break down what an Audio Effects Rack is.
A Rack is a flexible tool for working with effects, plug-ins and instruments in a track’s device chain. Racks can be used to build complex signal processors, dynamic performance instruments, stacked synthesizers and more. Yet they also streamline your device chain by bringing together your most essential controls. While Racks excel at handling multiple devices, they can extend the abilities of even a single device by defining new control relationships between its parameters.
From the Ableton manual
Ableton has its own Audio Effect Racks presets, ranging from Mixing and Mastering, Performance and DJ to Amp Simulation and Distortion. Having a look at these is a great way to help you understand how they are built.
A Deep Dive in an Audio Effects Rack
Audio effects racks work similarly to when you add effects onto a track. They follow a signal flow and have the ability to support multiple chains. Now, what does this mean?
Within a chain, devices are connected to each other, meaning that the signal goes from one device to the next, from left to right. When you have a single track, for example, and you insert some audio effect devices, they can’t be put in random order!
In an audio effects rack, you can have multiple chains. When a signal goes through multiple chains, it operates in parallel. This means that each chain receives the same input signal at the same time and then processes the signals (from left to right) through its own devices within each chain. The signal outputs are then mixed together.
Macros are another feature of effects racks that provides you with flexibility and more control over your track. You can assign macro controls to parameters from the devices within the rack, making accessing specific parameters in the chain much easier. Furthermore, you can map as many parameters as you like from any device!
If you have a MIDI controller, you can use MIDI mapping to assign specific macros to your MIDI knob controllers for better practical control, perfect if you want to record in automation of said parameters.
Lastly, audio effects racks have different views, offering different perspectives that can be shown or hidden depending on what you are working on or your preferences. A view column can be found on the left-hand side; different views include:
- Macro Controls
- Macro variations
- Devices
- Chain Lists
When to use an Effects Rack
Now that we know what an audio effects rack consists of, when should you use one?
Sound designers will find audio effects racks beneficial as they are highly customizable and allow for control over many combinations of devices and parameters.
Macro assignment is a standout feature of an audio effects rack due to its personalized approach to sculpting sounds. It can open up even more possibilities within sound design, resulting in endless possibilities. If you use a MIDI controller, you may prefer to automate parameters with control knobs, rather than drawing them in the automation lanes. As you can assign macros to virtually any parameter on any device, this makes automation a breeze. Additionally, you can assign multiple settings to a single macro knob if you want to control several parameters simultaneously.
One of the more popular reasons to use an audio effects rack is when you want parallel processing, specifically creating your own dry/wet control. Most stock audio effect racks included in Ableton will include a dry/wet macro control. This can also be split up into specific frequency ranges (low, mid, and high). Having a dry/wet control is an essential tool for those looking for subtle audio effect applications.
How To Build a Simple Effects Rack
So, we know that these are super useful for sound design, practicality, and customization. How do we build one?!
Let’s keep it simple and create an Audio Effects Rack with a Dry and Wet chain.
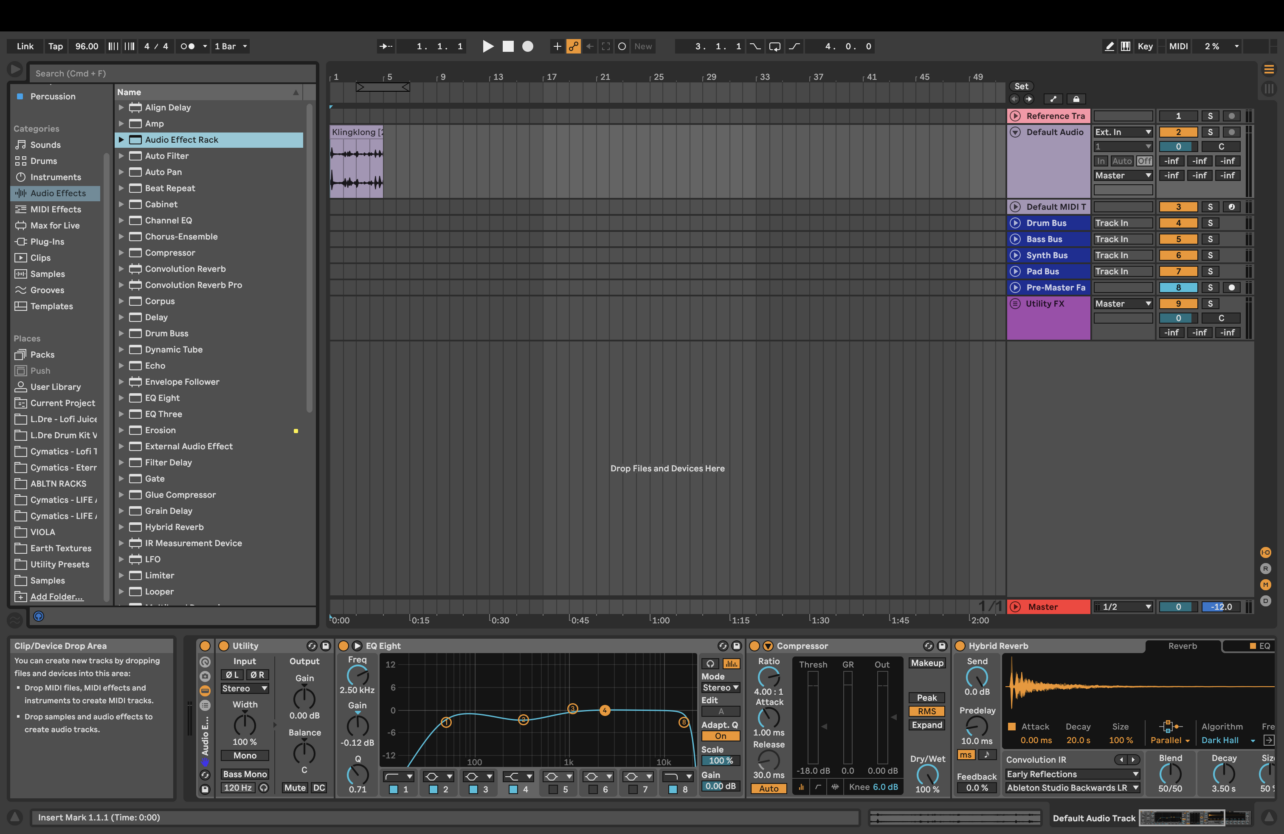
Step 1: Grab an Audio Effects Rack
Drag The Audio Effects rack, found in the Audio Effects menu, onto your track, and it will appear at the bottom part of your screen.
Step 2: Insert your desired effects
This is where you can start to build the signal chain of your effects rack. This works similarly to when you are applying effects to a track normally. The Rack is a tool to group them all together essentially. With that, be mindful of the order they go in! You will want to put an EQ and Compressor early in the chain before putting effects such as saturation, reverb, delay, and filters. Or you can keep it super simple and start out with a Reverb and Delay. Here’s an example of one with a Utility, EQ, Compressor, and a Reverb.

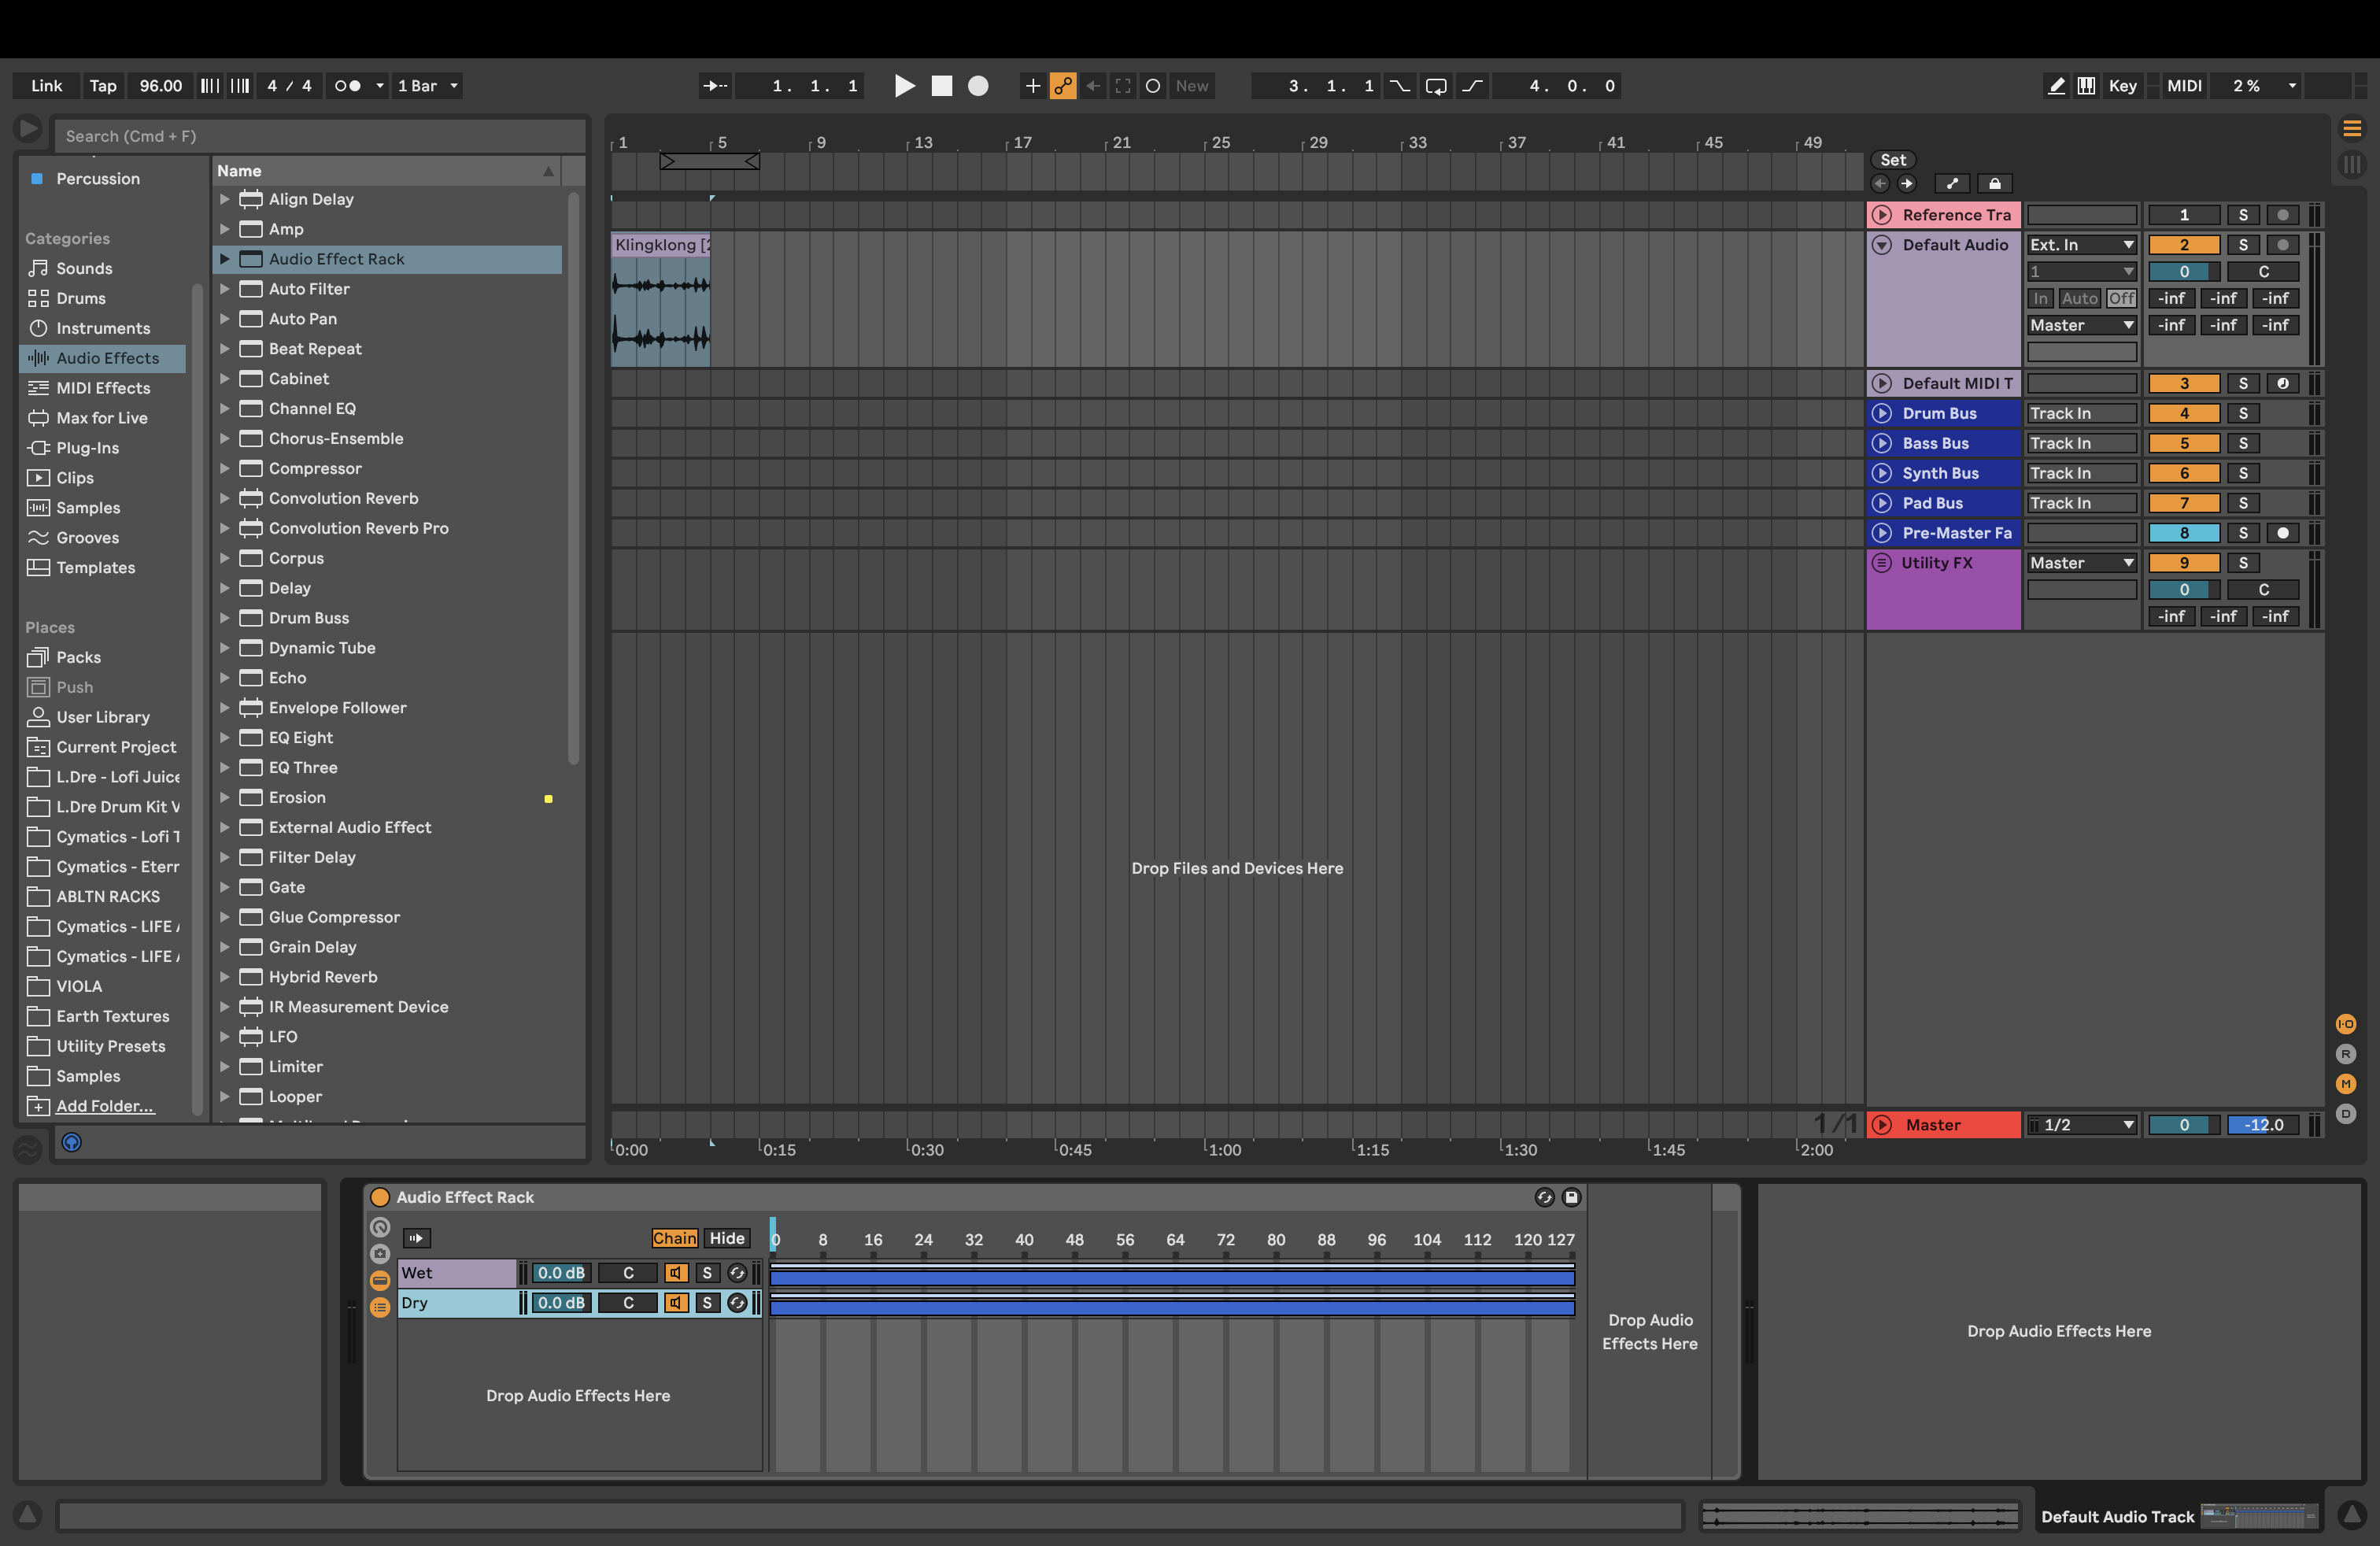
Step 3: Insert another chain
From step 2, we have just built a wet chain that holds all of the effects. We now need another chain for the dry signal. This is a method called parallel processing. To make another chain, select Chain List on the left, right-click, and select Create Chain. You can rename this chain “Dry” and the first chain we built as “Wet” (cmd/ctrl R to rename).
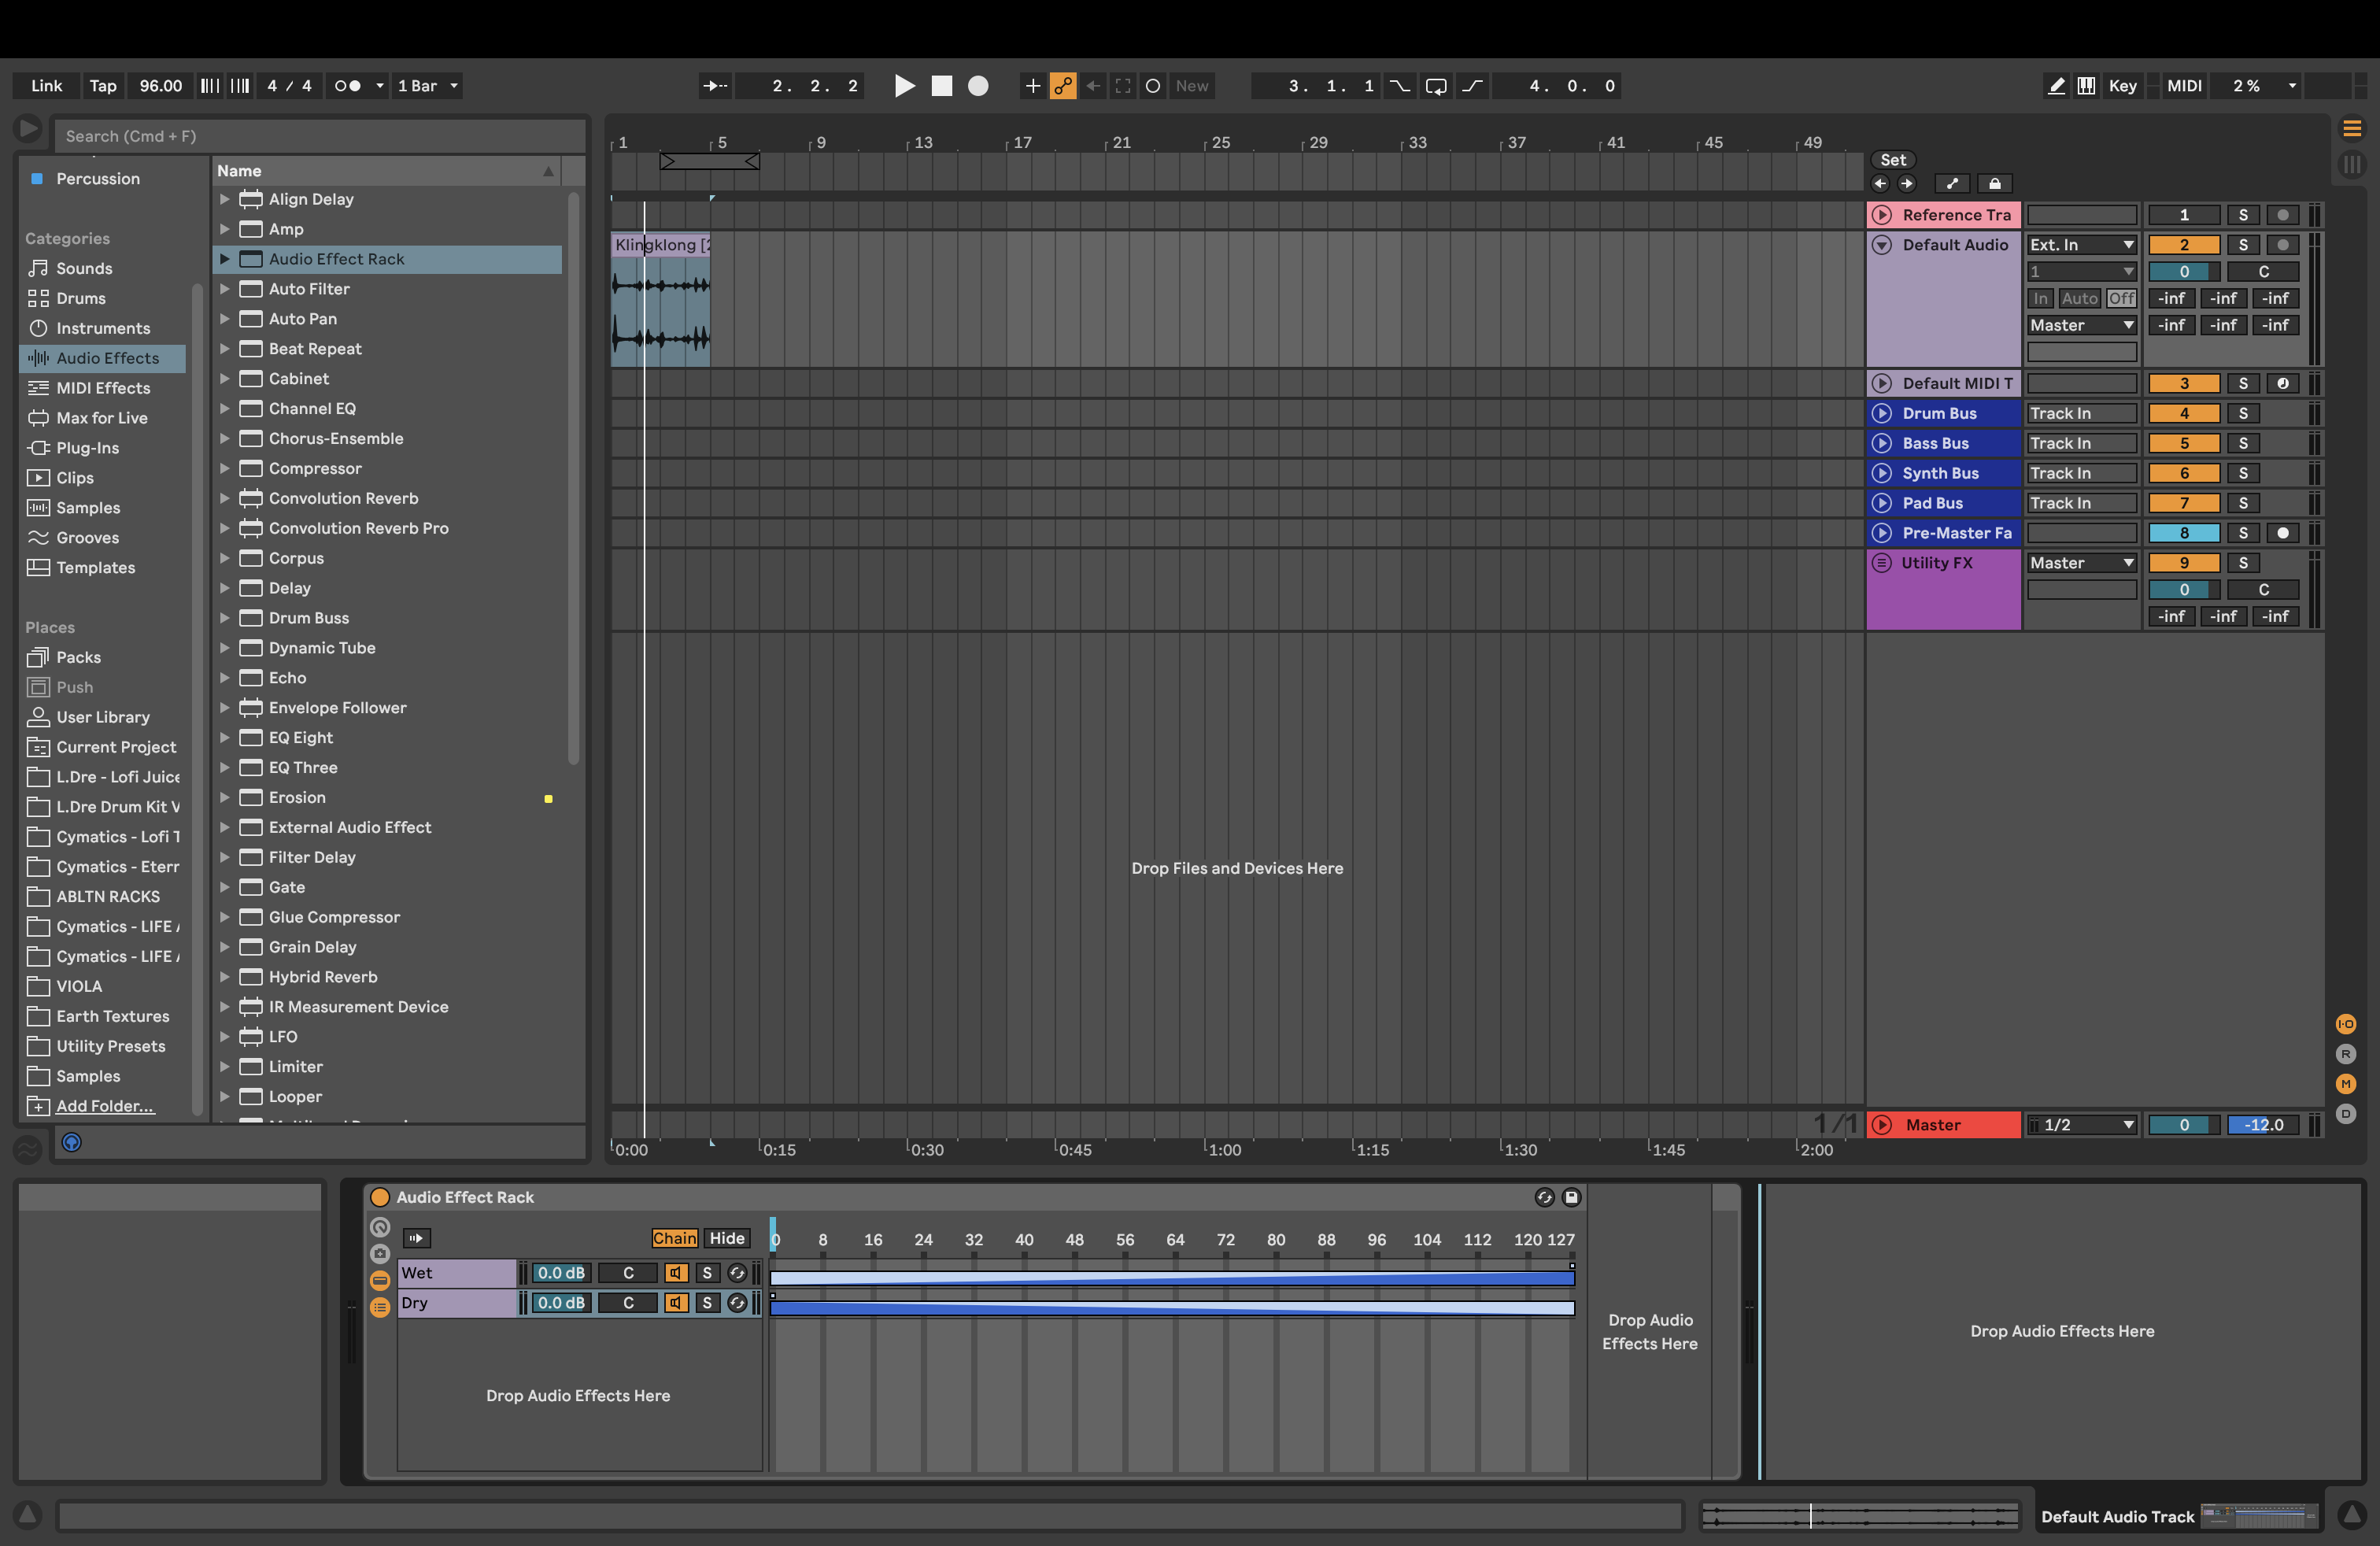
Step 4: Adjust the zone editors for each chain
This step is essential when creating a Dry/Wet control. We need to adjust the zone editors to assign a dry/wet macro control. When in the chain view, select Chain, which will bring up the zone editor. Select both chains and drag the blue bar to the max.
Next, we need to adjust the Fade Range for each zone. This attenuates the values that are outside of the ranges, and what allows us to get the dry/wet control. With the wet chain, drag the light blue bar above (the fade range, it’s quite small!) all the way to the right. For the dry chain, you do the opposite, drag from right to left.
Step 5: Assign to Macros
To map any macro, we need to select Map at the top of the audio effect rack. From here, the assignable parameters will be highlighted in green. Click the parameter you want to assign; in this case, we select the Chain Select Ruler. Then click on a macro control (ensure you have the Macro view selected so you can see the macro controls), and you now have a simple dry/wet control!

Having a dry/wet chain control for the overall effects chain has many uses. You don’t have to insert another chain; just map the parameters found in your effects. This makes controlling automation super easy and assigning multiple macros from just one device. For example, you can assign a macro for the frequency parameter on an Auto Filter and a macro for the resonance.
Step 6 (optional): Adjust Macro Mappings
This is a completely optional step but necessary if you want even more control over your effects. Upon selecting the Map option to assign macros, you will be greeted with a window on the top left that shows all the macro mappings. Here, you can adjust the minimum and maximum of the individual macros.
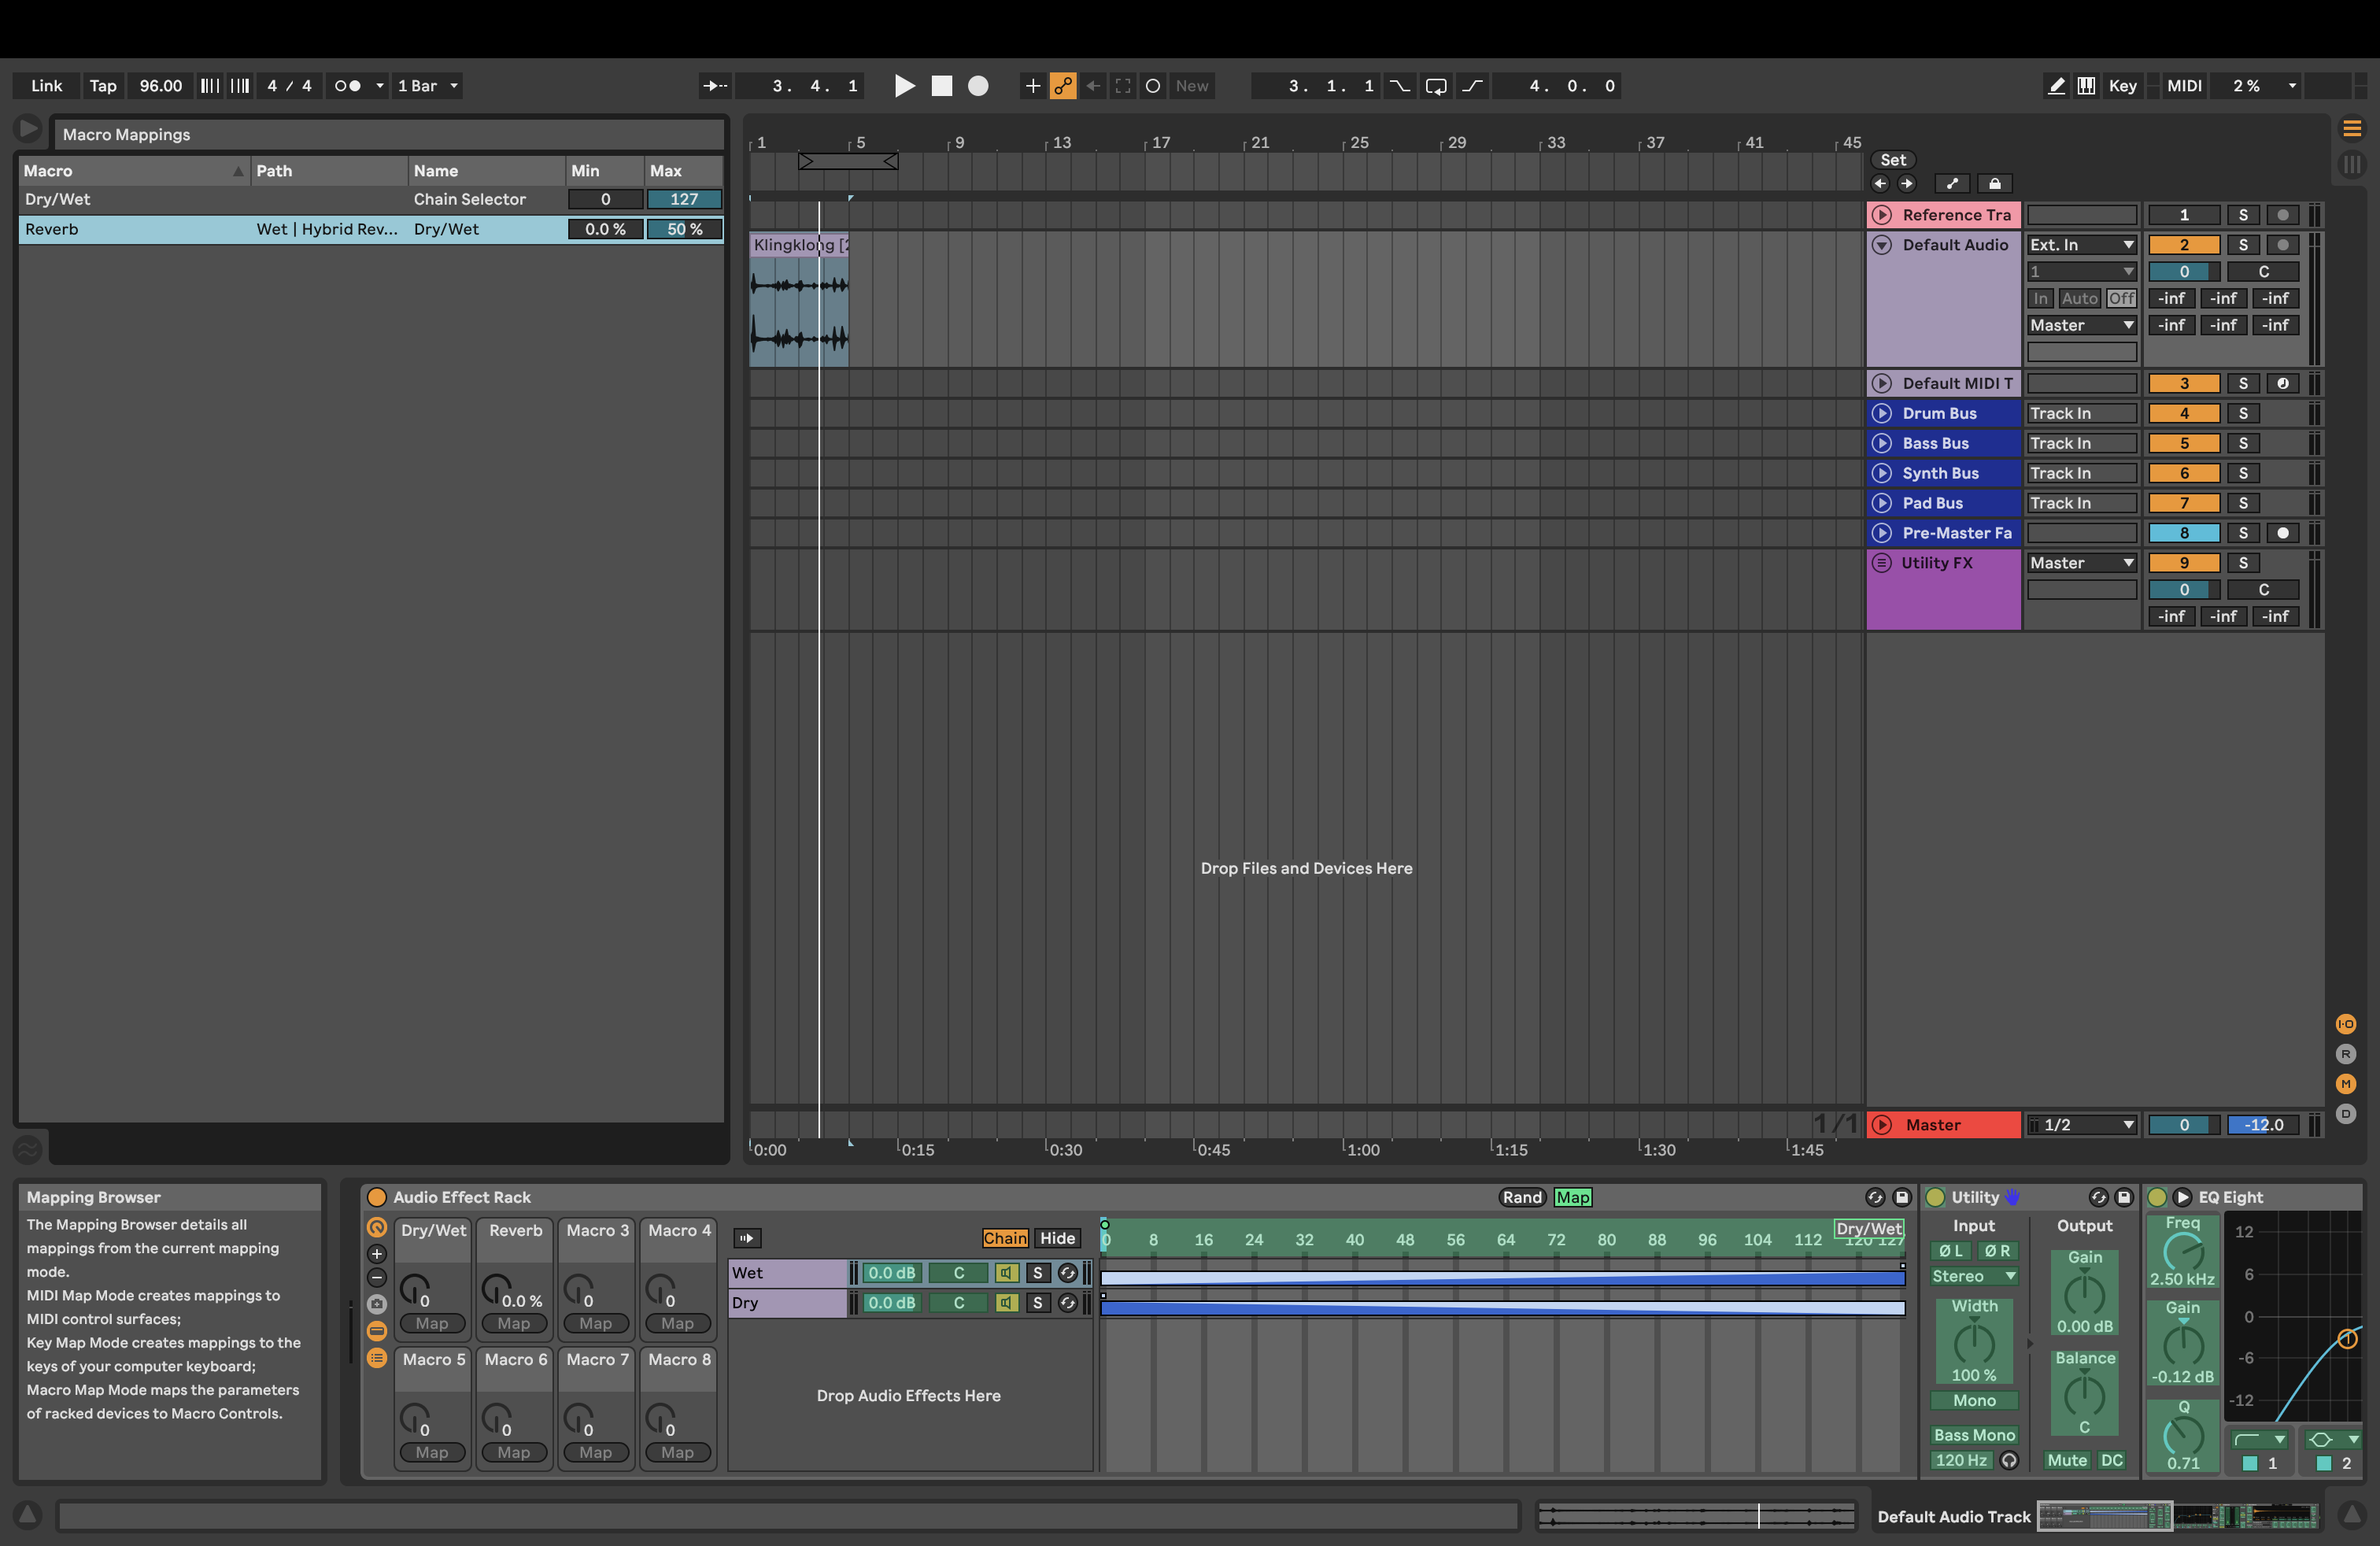
In this example, I’m setting my maximum value for the reverb’s dry/wet control to only 50%.
Give It A Go!
Using audio effects racks can open a world of sound possibilities you never thought you could achieve. With highly customizable macro mappings, parallel processing with multiple chains, and more, shaping sounds for any occasion becomes much more streamlined and tailored to your own individual creativity.
This is only one of many exceptional things that Ableton can provide. Once you have created your own effects rack, you can save it for later. This can be done by going to the beginning of the effects rack and clicking the small save icon at the bottom. Then, you can find them in your User Library or in the Audio Effects Rack folder. Another useful way to get to known audio effects racks is to look through Ableton’s stock presets and analyze how they are constructed, in addition to modifying them yourself.
For more on Ableton, check out these articles:
10 Tips For A Better Workflow in Ableton Live 11
How to connect Hologram Electronics’s Microcosm to Ableton Live 11